Character Controller Tech Talk

There are a lot of other things I want to write devlogs about, so I’ll start at the beginning: the character controller. For those not in the know, character controller is the term for how your character moves in a game. It’s the code that takes your inputs, and translates them into changing your character’s position in the world. In games that have them, this is generally one of the first, if not the first, things developed. Talking about my character controller starts, as always, with a GDC talk: https://www.youtube.com/watch?v=hG9SzQxaCm8&ab_channel=GDC. This is a math-heavy talk, just like I like it. It goes into the math behind jumps, and how to go about designing the jump for your game. A simple approach to jumping might be something like:
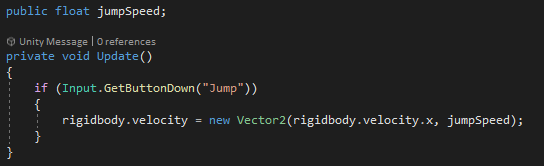
In Unity, a rigidbody is the component that makes an object affected by physics. If you want to be able to apply forces to an object, have it collide with other objects, or be affected by gravity, you need a rigidbody on that object. For our character, we do want them to be affected by gravity, and collide with other objects, so it doesn’t fall through the floor and whatnot, so you need a rigidbody on your player character, even if you don’t think of your movement as being “physics-driven”. So this approach would just give you a jump speed variable, that Unity will let you set from the editor, and you can experiment with that value until you find a good feeling jump. But you’ll also need to experiment simultaneously with the gravity scale on your rigidbody. Because with the normal gravity scale of 1 (earth gravity), your jumps will feel incredibly floaty. Because this is a video game, not the real world.
People in the real world don’t jump multiple times their height. People who are really good at jumping in the real world might jump a third to half of their height. Mario jumps about three times his height on an off day. If he jumped that high with regular earth gravity, he would be airborne for about 4 seconds. In the actual games, he’s only airborne for about 1 second. That’s way higher gravity than we have on earth. The gravity also varies at different points of his jump. The gravity is higher on the way down than on the way up. The gravity is lower as long as you’re holding the jump button. That’s how jumping higher the longer you hold the jump button works.
[Insert outdated meme format about how it’s all gravity and always has been]
Tweaking one number until something feels good is okay, but tweaking two numbers at a time is a pain. So I took the approach in the GDC talk above, and used the power of Math. So we’re going to be talking some light calculus here.
The Math of Jumping
There are three relevant properties when we’re talking about motion of a character: position, velocity, and acceleration. Acceleration is the derivative, or rate of change, of velocity, and velocity is in turn the derivative of position. That means position is the integral, or opposite of the derivative, of velocity, and velocity is the integral of acceleration. And for a jump arc, we know the acceleration is a constant: it’s just acceleration due to gravity. We don’t know what that constant is yet, but we know it will be a constant. It will switch between different constants in different parts of the jump arc, but they’ll all be constants. We just need to find them. It’s a little outside the scope of this devlog to explain integral calculus, so I’ll just do it.
To explain the parameters here, g is acceleration due to gravity, ay is acceleration along the y axis (the vertical axis in Unity), vy is velocity along the y axis, y is the position along the y axis, v0 is the starting y velocity (which is our jump speed), and y0 is the starting y position, which we can just assume is 0 because we’re interested in how much elevation we gain with the jump, not the absolute elevation we reach.
I already defined a horizontal movement speed, vx. Running comes before jumping. Now I define two more parameters: jump height, and horizontal distance covered by the time we reach the top of our jump. We’ll represent jump height as y1, and horizontal distance by that point as x1. So we need to calculate the time it takes to travel that horizontal distance based on the horizontal movement speed we already decided on.
Then we calculate the gravity and jump speed based on that and how high we want to be able to jump.
We know at the top of the jump arc, vertical velocity is 0, so we can plug that in.
Now we have the relationship between our jump velocity and our gravity scale, and we can make a substitution into the height equation.
And we can plug that value of g back into the velocity equation to solve for v0:
Which simplifies to:
Now we have both g and v0 defined in terms of y1, vx, and x1, which are intuitive parameters we can set. We can make a conscious decision how high we want to be able to jump, and how far, and design our levels around it. Then we can just tweak the horizontal movement speed until everything feels good. I set mine to a jump height of 5 and 5 units horizontally by the peak. And then I was able to design all of my levels around those parameters.
I also set a minimum jump height (let’s call it y2) and a horizontal distance you can travel from the peak of the jump arc to landing (assuming you land at the same height you jumped from) (let’s call it x2). The maximum jump height of 5 is reached if you hold the jump button all the way until you reach the peak of the arc. The minimum jump height is if you just barely tap it and release it immediately. Either way, you jump with the same initial velocity, v0. It’s just the gravity that changes. So let’s calculate the gravity needed for the minimum jump height, and call it g1.
So there we have it, the gravity to apply while not holding the jump button, expressed in terms of the initial jump velocity and the minimum jump height. Now we need to calculate the gravity to apply during the fall, so we can cover that horizontal distance x2. Let’s call this gravity g2. In this case, we’re starting at the peak of the jump, so we know our starting velocity is 0, our starting y is y1, and our final y is 0.
There’s the gravity expressed in terms of the max jump height and the time it takes to fall. We can calculate the time we want it to take to fall, of course, based on how far we want to be able to move horizontally during the fall.
Now we can substitute that into our previous equation to get g2 in terms of our known parameters.
And there we have it. I can set intuitive parameters in the Unity editor, like minimum jump height, maximum jump height, horizontal distance pre peak, horizontal distance post peak, and horizontal movement speed, and my character controller’s initialization code will use these equations to calculate the underlying values necessary to achieve that, including initial jump velocity, gravity while the jump button is held, gravity while the jump button is not held, and gravity when the character is falling downward.
But wait, I skipped over horizontal movement
Motivated by the success of that approach for jump parameters, I decided to try the same thing for my horizontal movement parameters. In particular, acceleration and deceleration. Because I don’t actually think of my movement in terms of “what is my acceleration in m/s2?” I think of it in terms of “how long does it take to reach full speed?” So I defined acceleration time, active deceleration time, and passive deceleration time parameters to set in the editor, and I have my character controller calculate the acceleration and deceleration rates on initialization.
This formula is already solved for the variable I’m interested in. v is the max horizontal speed, and t is the acceleration or deceleration time.
Active deceleration happens if the player pushes the joystick in the opposite direction of the character’s current velocity. Passive deceleration happens if the player just releases the joystick. I set acceleration time to 0.25 second, active deceleration to 0.125 second, and passive deceleration to 0.25 second. It feels good.
Polish
There are some polish steps necessary to make any platformer controller feel good. One of those is called coyote time. That’s what it’s called when the game gives you a little bit of forgiveness for pressing the jump button a bit too late when you’ve technically already run off the ledge. Another is input buffering. This is kind of the opposite. If you press the jump button a little bit too soon before landing, it goes ahead and jumps as soon as you land. I added both of those in. So I added in a couple more parameters to my character control code, and a couple more private fields. The parameters I can set from the editor are “coyote time” and “jump buffer time”. The private fields are “timeLastTouchedFloor” and “timeLastPressedJump”. Now, I record the current time as timeLastTouchedFloor every frame as long as the character is touching the ground. When the jump button is pressed, I check that the current time is less than or equal to timeLastTouchedFloor + coyoteTime, and if so, the character can jump. If the character is not on the floor when the jump button is pressed, then I record the current time to timeLastPressedJump. Once the player is on the floor again, I immediately check if the current time is less than or equal to timeLastPressedJump + jumpBufferTime, and if so, trigger another jump.
I Didn’t Copy Mark Brown, He Copied Me
I started this project in a game jam in November 2021. It was this game jam: https://itch.io/jam/seattle-indies-slow-jam-2021. I didn’t finish anything enough to submit to that jam. Can you imagine finishing a Metroidlike game in a two week game jam? Poor, sweet, naive me of two and a half years ago. And that was when I was still working a full-time tech job. It was absolutely hopeless.
To be clear, I didn’t expect to finish a whole Metroidlike game in that game jam, just having a demo level with a few of the abilities. But even that was too big a scope.
Anyway, I started on this before Mark Brown made his Platformer Toolkit (https://gmtk.itch.io/platformer-toolkit) in June 2022. So I’m not copying him here. Platformer Toolkit is a good resource. You should check it out after reading this, if you haven’t already.
And for the record, I know he didn’t copy me either. I wasn’t posting publicly about this game back then. But I do suspect he referenced the same GDC talk that I did.
Adding in the Metroidlike abilities
So I had running and jumping feeling good, but this isn’t just a platformer; it’s a Metroidlike. The first ability I added, of course, was the double jump. For this, I added in a new parameter, the air jump height. On the air jump, you will have the same gravity parameters as a regular ground jump, but you may have a different max jump height. That means the air jump will need a different initial velocity.
Hey, first square root of the night! So I add in the air jump and calculate the initial velocity of the air jump based on the maximum jump height gravity we already calculated for our ground jump. I implement the air jump by keeping track of a “number of air jumps remaining” counter. Each time you press the jump button in the air, it checks that the counter is greater than 0, and if so, decrements it, and does an air jump. Then the counter resets when you land. So technically, I could do triple jumps, quadruple jumps, or however many I wanted using this system.
Next is the dash. I decided to define the dash in these terms:
- Duration of the dash
- Distance covered by the dash
- Cooldown time for the dash
Of course, to code it, I need to know the dash velocity. Since my dash is a constant speed, that’s easy. It’s just distancetime.
Next, I added wall jumps. For wall jumps, I set the angle I want your initial jump trajectory to make with the wall, and the max wall jump height. Wall jumps, unlike ground or air jumps, have a horizontal component to them. The vertical component of that jump, though, can be calculated the same way as the air jump speed, as we still know the gravity and the max jump height. And we can calculate the horizontal component using some trigonometry with that angle.
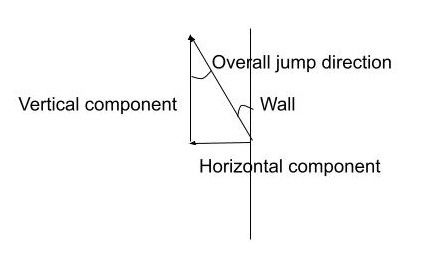
I defined the angle between the wall and the jump direction, as marked in this ugly diagram. And we know the vertical component of the jump. So we have an angle, and an adjacent leg length in a right triangle, and we want to find the opposite leg length. That’s a job for tangent.
Don’t ever let anyone tell you you won’t use high school math in the real world.
I detect if the character is pushing into a wall using a raycast just longer than half the character’s width, from the center of the character, in the direction they are facing. If it detects something, it shifts the character into wall sliding mode. Well, it actually shifted the character into wall sticking mode. Originally, when you clung to a wall, you started sticking in place, and after about a second, you started sliding down the wall. Those were dark times.
I ran into a bug here, where when you tried to jump off a wall, you immediately stuck back to it. Because it turns out, for the first frame or two of your jump, you are still close enough to the wall for it to count as touching. I fixed that by making it only check if you’re against a wall if you’re on your way down. I think that’s better for gameplay anyway. Now you can jump into a wall, reach the full height of your jump, and start wall sliding only once you are on the way down. Now wall sliding can slow your fall, but not stop your rise. And because you do start your jump moving upward, it fixes the bug.
Not long after I started designing actual levels, I realized how tedious it was to do any platforming that required sliding down a wall, because you have to wait about a second in order to actually start sliding. So I switched it around. Now, when you hit a wall, you immediately start sliding down, and you can hold a button at any point to freeze in place. I originally added the freeze in place mechanic so you can aim a shot from the wall during combat, but it also turns out to be quite useful in platforming.
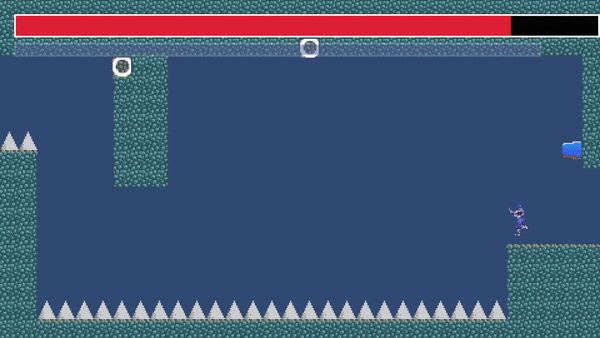
You used to have to wait for a whole second before starting to slide EVERY time you hit a wall! A second doesn’t sound like much, but in platformer time, it feels like an eternity. And if you needed to stop to wait for an environmental hazard like in this gif, you couldn’t. You had to just jump off the wall to reposition a little higher up. And if you got a little too high to jump within the gap you have here, you had to wait a full second to start sliding down again!
This is way better.
Refactoring
By this point, I had one enormous file of character controller code. This one file, over 700 lines by this point, included logic for running; jumping; having different gravity scales for different parts of a jump arc; having different acceleration, active deceleration, and passive deceleration on the ground vs. in the air; coyote time; input buffering; double jumping; dashing; wall sliding; wall sticking; and wall jumping. And there were many more features to go. I still had plans for gliding, grappling, and essentially using the kickback of a downward shotgun shot as an additional jump. And there were already some bugs. I needed to reorganize all of this code into a more manageable form. So I looked at what all the character did, and realized that there were many different states the character could be in, each of which had their own rules of motion.
Many programmers’ ears just perked up at the word states.
[Insert another outdated meme format about how it’s all states, and always has been]
So I converted it all into a finite state machine. Walking on the ground was one state, jumping with the jump button still held was one state, jumping with the jump button no longer held was one state, falling was one state. Dashing, wall sliding, wall sticking, were all their own state. Once I implemented them, gliding, grappling, and kickback would each be their own states as well. The state machine ended up looking like this:

Why were jumping with the jump button held, jumping with the button no longer held, and falling, three different states? Because they have three different gravity scales, and I made the decision to have states only set the gravity scale on enter, so I needed at least one state per gravity scale. It also worked out to simplify my logic for whether you should go into a wall slide. Only falling can go into a wall slide, not either of the ascending jump states. I also made it so that you can only start gliding from a falling state. So, like wall sliding, gliding can only slow your fall, not stop your ascent.
Now, the other question you may have is, what’s that free physics state over there by itself? That is the state that takes over when you stagger from getting hit. It temporarily turns you into a plain physics object with no special movement logic. Then you switch to the falling state and the regular movement logic resumes. I also would use this state for shotgun kickback and grappling for a while. After much testing and tweaking, I concluded that grappling and shotgun kickback just didn’t work well as pure physics movement. They needed more precise movement logic, so they would eventually each become their own states.
The on ground state would transition to the falling state if it detected that there was no longer ground underneath your character. So I re-implemented coyote time by just adding a slight delay to that state transition. That way, if you press the jump button during that delay, you can still jump and transition to the jump button held state.
I re-implemented input buffering in a more general form for all inputs, not just the jump button. Now inputs are handled by a separate component, the Player Input Proxy. This component checks all of the inputs every frame, and records what buttons were just pressed. It queues every button press event for a short time, so when another component (like the character controller) queries it whether a button is pressed (like the jump button), it will return whether a jump button press event is queued from the past 0.15 second or so, and then it will reset that button status.
Rebranding Abilities
Early on in development, the game changed from a cross between Metroid and Doom to Metroid, Doom, and Avatar, so I recategorized the powers. Wall jump was now a water power, because you freeze your hand to the wall to hold yourself in place. Grappling became a water power, because your grappling hook is actually a water tendril, I guess.
It’s called surface tension. Look it up.
Double jump, dash, and glide became air powers, of course. The laser gun became a heat beam, and the shotgun became a short-range fire burst. I have since started playing Baldur’s Gate 3 and calling it Burning Hands. The mine launcher became an explosive stalactite creation, and it and drill became earth powers.
Air had 3 powers, so I made it my goal for every element to get 3 powers. Water was already at 2, so I added healing to make it 3. Fire was already at 2, so I added a teleporting glory kill as a third. Now you can fly across the screen in a great ball of fire to glory kill a stunned enemy, and it can be used for both combat and platforming.
The drill was intended to be like the chainsaw in Doom, but it sucked, so I cut it and replaced it with a defensive move where you summon a rock in front of you to block or parry enemy attacks. And to make 3 for earth, I added a down slam.
When All You Have is a State Machine…
Down slamming became a new state on the state machine. I wanted to add a brief pause in midair before you started moving downward, so that pause became its own separate state. I wanted to add a recovery time on the ground before you could start moving again, so that recovery time became its own state.
I redesigned the grappling hook so instead of just pulling you toward the grapple surface slowly while leaving gravity and stuff intact, it instead allows you to swing freely from the grapple point, and then temporarily nullifies gravity and pulls you in very fast when you press the jump button.
So, of course, grapple swinging and grapple pulling each became their own states. I wanted your movement to stop for the split second that your tendril is reaching the grapple point, because sometimes during testing the character would fall into a spike during that time and that felt bad. So that short pause? You bet it became its own state.
My next devlog might be entirely about the grappling hook, because there’s also some fun math and physics to geek out about there, as well as some good games to shout out as inspirations.
I redesigned the Burning Hands kickback to be more like a jump, so I made another state just for the aftermath of a kickback. That state has basically the same logic as the jump button held state, except it doesn’t transition out if the jump button isn't held, because you entered that state without pressing the jump button.
So the final state machine ended up looking like this:
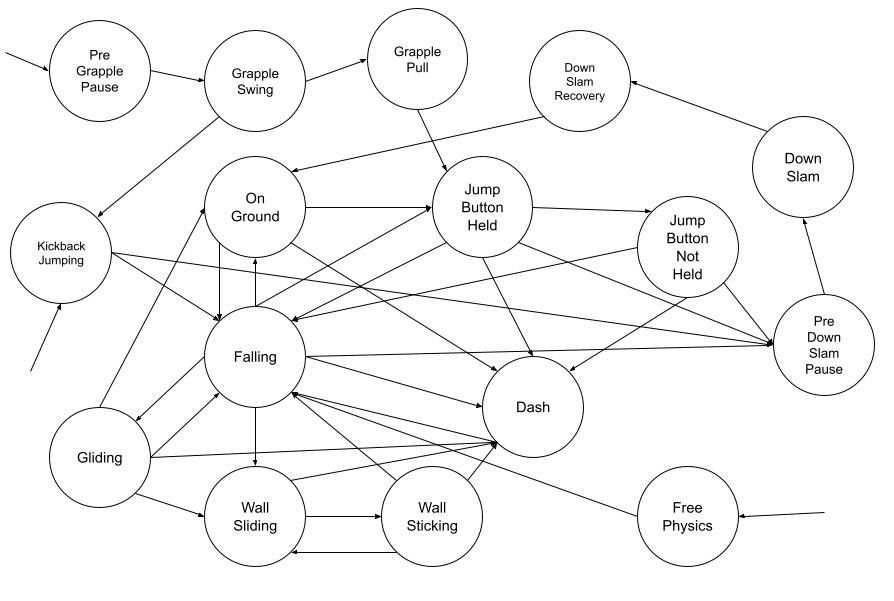
The arrows into each state indicate that the transition to that state is caused by an outside stimulus, not the internal logic of the state machine. It looks like a mess diagrammed out like this, but it’s actually quite clean in code. Each state is its own class, with an OnEnter, OnExit, OnUpdate, and OnFixedUpdate function. They have access to the utilities they need, like setting gravity scale, getting and setting velocity, triggering animations, applying force, checking input, enabling and disabling input maps, and switching states through their CharacterState parent class. This programming pattern is known as a Subclass Sandbox: https://gameprogrammingpatterns.com/subclass-sandbox.html.
Some of these classes have similar bits of logic, just with different parameters. For example, all of the midair states, and the on ground state allow you to control your horizontal movement based on acceleration, active deceleration, and passive deceleration. The midair states even use the same parameters, and the ground state uses the same logic, just with different parameters. So that logic is pulled out into a HorizontalMovementEffector helper class, so I don’t have to duplicate that logic. Several of these states allow you to jump, but some with different jump speeds than others. So I pulled that logic out to a JumpEffector helper class, so I don’t have to duplicate that logic.
They all have their own internal logic needed to manage the logic for their state, and to know when to switch to another state. How do they know how to find the state to switch to? Through the magic on public const strings. All of the states are registered in my main character controller class using their names, which are all public const strings. Then, the main character controller class has a public property:
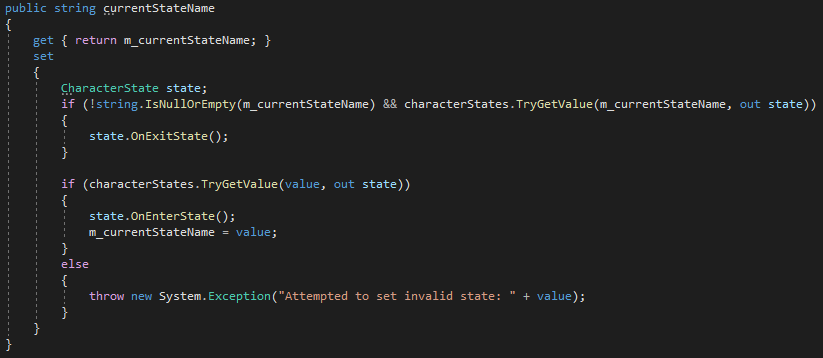
In summary, this will allow any code in my game to set the current state of the character controller by name, and it will call the OnExitState function of its current state, update to the new state, and call the OnEnterState function of the new one. This is done mostly by the states themselves, but also by things like the burning hands weapon, the grappling hook weapon, and the stagger trigger of the hurtbox.
Conclusion
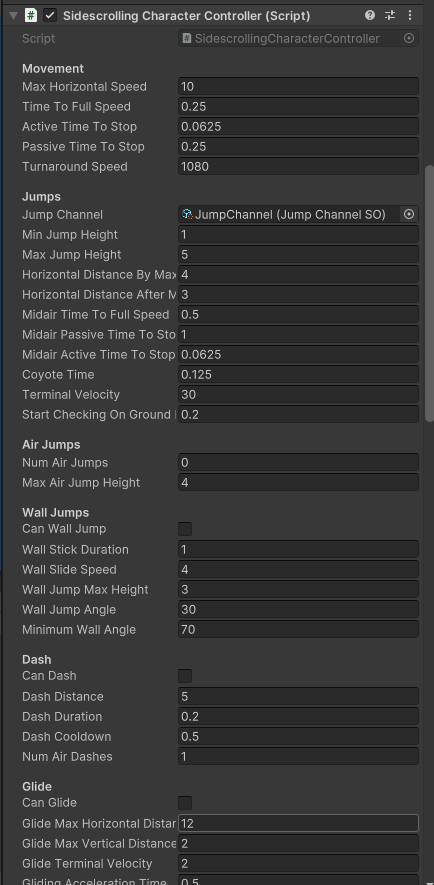
Overall, there is more code now than there would be if all that logic was just in the character controller like I originally had it. Now the logic is spread across 20 files, a lot easier to keep separate things separate, and a lot easier to find the piece I’m looking for at any given moment. I do not think I would have been able to rework the grappling hook as cleanly as I did if the character controller didn’t have this structure. My main character controller class is at 460 lines of code now, which sounds like a lot, but literally over 100 of that is just parameters that I can set in the editor. This is what the inspector for my character controller looks like:
Continued:
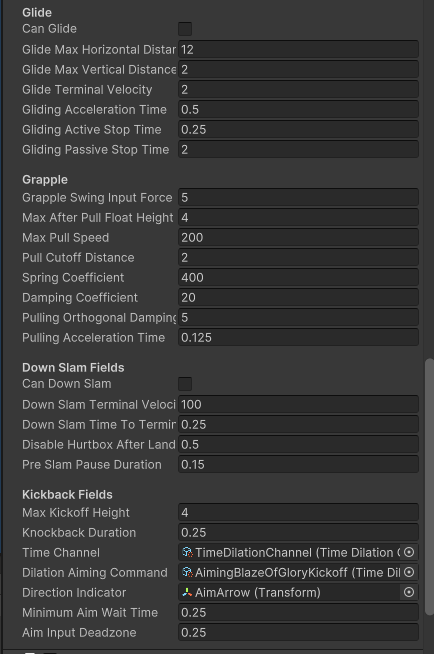
There are so many parameters the inspector literally won’t fit on one screen. Another 180 lines is just doing all those calculations I went over here and setting up the state machine. Another 100 lines are just public properties so that the ability pickups can set the various features to enabled. So there really isn’t much runtime logic to that class now. It’s just an orchestrator for all the various states, which are where the logic actually lives. And that makes it a lot easier to manage the complexity of this character controller. If you have a complex character controller, you might benefit from coding your character controller as a state machine too.
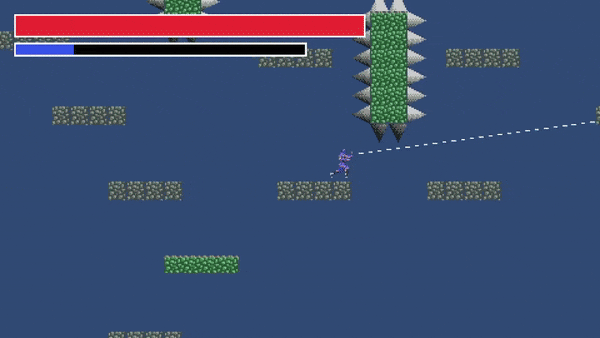
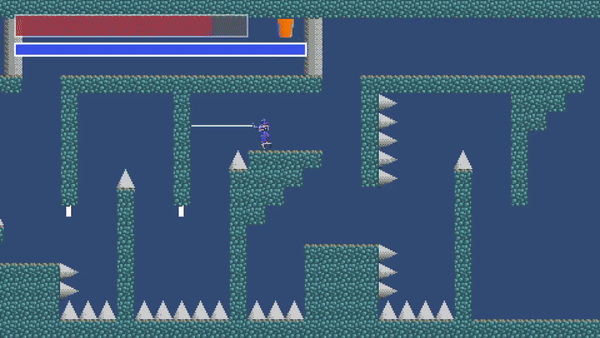
And that’s it. That’s how my character controller works. State machines are cool. Math is fun. I posted some gifs of the character controller in action. It works really well. Look at it go!
Leave a comment
Log in with itch.io to leave a comment.