Enemy AI Tech Talk
If you read my first dev log, you’ll know that one of the big inspirations I had was this GDC talk about Doom’s combat. They talked about several AI techniques they used to make their enemies so engaging to rip and tear apart.
- Enemies make no effort to take cover. They wanted enemies to be quick and easy to shoot. They wanted you to focus on moving quickly and tactically rather than fine-tuned aiming. They had a standard shooter engine that already had utility AI built in to make enemies prefer spots behind cover. So they negated the default utility function to make enemies prefer the open and hate spots behind cover.
- Enemies were limited in how many of them could attack at once. They implemented this using a token. There was a shared pool of “tokens” for all enemies, and an enemy had to acquire a token from that pool before it could attack. It then returned that token to the pool when it was finished attacking. If there were no tokens left in the pool, an enemy couldn’t attack until one was returned.
- There was an exception to this. In some circumstances, an enemy could steal a token from another enemy, so they could attack, but they would force the other enemy to cancel their attack. The main situation where this was used was an on-screen enemy stealing a token from an off-screen enemy. The player will see the on-screen attacking, and they wouldn’t have seen the off-screen enemy attacking. They also won’t see the off-screen enemy having to cancel their attack, so this can happen without the player even noticing it.
- This gave them another handle to adjust difficulty. Higher difficulty settings have larger token pools, so more enemies can attack at once, which translates to enemies seeming more aggressive.
- Enemies are programmed to be less accurate the faster you are moving. They programmed statistical distributions for how accurate enemy projectiles should be based on the player’s speed. If the player is standing still, their shots have a normal distribution with a mean of perfectly accurate, and a low standard deviation. If the player is moving at full speed, the mean will be 3 meters off. They interpolated between the two curves for speed in between 0 and top speed. This encouraged players to always stay on the move.
- The old Doom games had the ability for enemies to start fighting each other, but they wanted to make the conditions for that more specific and require more input from the player for the new Doom games. In the old games, once enemies got distracted fighting each other, you could kinda just let them go, and finish off the survivor once they were done. Doom 2016’s Push Forward Combat™ was a celebration of the player. They didn’t want anything to happen that wasn’t caused by the player, or that didn’t challenge the player to respond. A situation where the player could sit back and let the enemies kill each other didn’t fit that. So they developed a rule engine to allow designers to set specific conditions for when enemies would become hostile to each other, and when they would cease hostilities and turn their attention back to you. Any enemies fighting each other was only for a few seconds, not something long enough to let you just sit back and watch.
Since Doom is one of my inspirations, I wanted to recreate some of these features in this game. However, a lot changes when you go from 3D down to 2D. There’s a lot less room to dodge, and there’s a lot less ways for enemies to miss you with their projectiles. There also isn’t really a concept of cover. Just platforms that projectiles can’t pass through. And I decided pretty early on that enemies becoming hostile toward each other would be out of scope.
So I was left with these goals for my enemy AI:
- Make enemies intentionally not take cover, to make them quick and easy to shoot. This could be accomplished through a utility function which prioritizes spots with a clear line of sight to the player’s position.
- Limit how many enemies can attack at once with a token pool system.
- Add difficulty settings that use this to change enemy aggressiveness like they did in Doom.
- Make enemy projectiles less accurate the faster you are moving. I didn’t do that with anything fancy like a statistical distribution. I just have enemies shoot directly at where you are, so if you’re moving, they’ll shoot behind you. Of course, in 2D, this only works if the enemy is at a different height than you. You’re running straight horizontally, so if the projectile is moving straight horizontally, it’ll still hit. So I built into the enemies’ utility functions to prefer spots at different elevations than the player.
- Make a variety of different enemy behaviors that all ask different skills of the player.
I implemented the enemy AI and achieved these goals with three main components:
Main Component 1: The Pathing System
Some games can get away with not having a real pathing system for their enemy AI. Like Mario. Those koopas and goombas can just walk forward until they detect an edge, then turn around. Or just go off the edge. I’m pretty sure Hollow Knight didn’t need a fully fledged pathing system either. Flying enemies will either just fly in a pattern and bounce off of walls and floors alike, or make swooping patterns at you ignoring any level geometry in the way. Ground-based enemies will stick to the platform they spawn on.
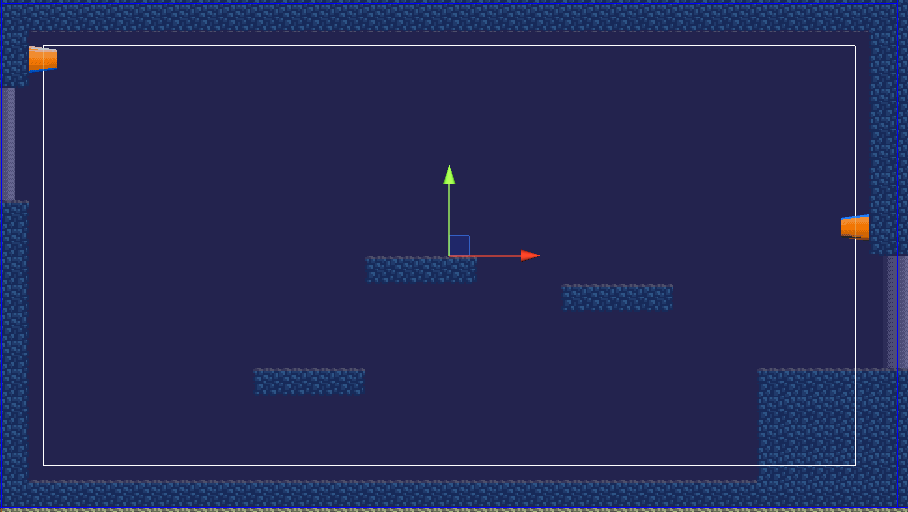
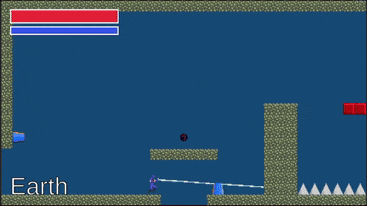
But this game does need a fully-fledged pathing system. That’s because I wanted an aggressive melee pursuer enemy, like Doom’s hell knight. It needed to be able to pursue you across different platforms, and jump or drop between them as needed.
Building the Graph
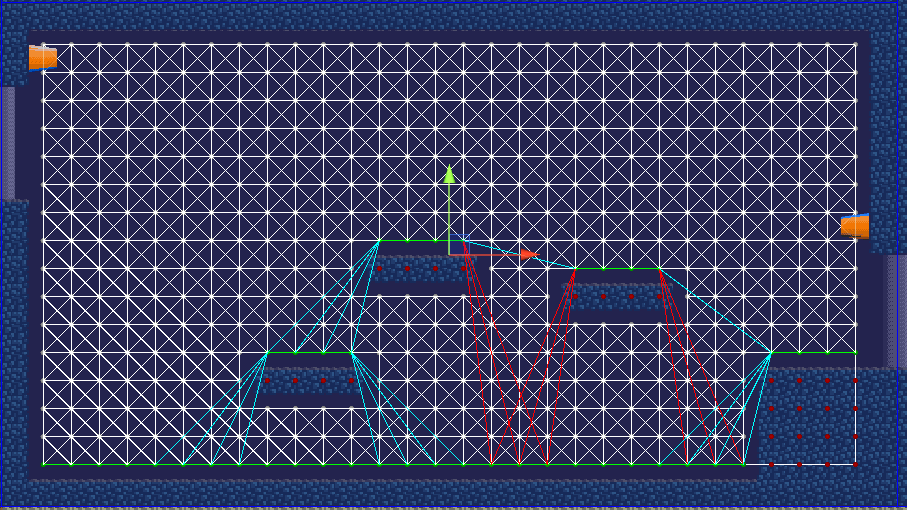
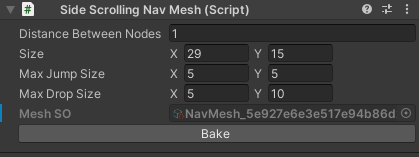
A cursory search of GitHub and the Unity Asset Store surprisingly showed nothing like what I was looking for. So I got excited that I had an excuse to implement A*, because I’m that guy. I’m not going to explain what A* is in this dev log. If you don’t know and you’re curious, here’s the wikipedia. A* is a graph algorithm, so it needed a graph to operate on. I developed a data structure I called a sidescrolling nav mesh, which acted as that graph. I built a utility to bake that nav mesh ahead of time so I wouldn’t have to do any fancy searches to find where all an enemy could jump to at runtime. The way it worked was:
1. Check all of the nav vertices. For a nav mesh, I could set the position and dimensions of the navigable area, and the distance between nav vertices, and it would place all of the vertices in a 2D grid based on those specs. The first task was to figure out the terrain type of each vertice. The possible terrain types were:
- OnFloor
- InsideGeometry (non-navigable)
- OnWall
- OnCeiling
- InAir
I originally planned to have some enemies that could climb on walls or hang from ceilings, but cut that because I didn’t have the resources to animate those states. So I eventually cut the OnWall and OnCeiling terrain types as well, leaving us with only OnFloor, InAir, and InsideGeometry. The bake process decided which type each vertex was based on physics collision checks and raycasts in cardinal directions.
2. Connect adjacent vertices with edges. There were a few edge types as well:
- FloorTraversal
- Flying
- WallClimb
- CeilingClimb
- Jump
- Drop
WallClimb and CeilingClimb were cut just like the OnWall and OnCeiling terrain types. With the edge types left, the bake process connected all adjacent OnFloor vertices with FloorTraversal edges, and all adjacent or diagonal non-InsideGeometry vertices with Flying edges.
3. Find where there could be a valid jump or drop, and connect those vertices with the appropriate edges. I set a maximum jump size and a maximum drop size, each as Vector2 to specify a maximum vertical and horizontal distance. Then the bake process scanned all of the vertices, and found all OnFloor vertices that had adjacent non-floor vertices. For each of those, let’s call them Ledge Vertices, it checked to the non-floor side and down, up to a maximum distance in each direction based on the maximum jump and drop parameters. If there was an unobstructed drop to another floor vertex, and it was within the drop parameters, it added a drop edge from the higher floor vertex to the lower one. If it was within the jump parameters, it added a jump edge the opposite direction.
All of this nav mesh data was saved into one asset file using a ScriptableObject. I made a NavMesh MonoBehavior component that would reference one of these ScriptableObjects, use that data to calculate pathing in the game, and draw some helpful gizmos in the editor. I wrote a custom inspector to add a big “Bake” button to make it nice and easy.

Using the Graph
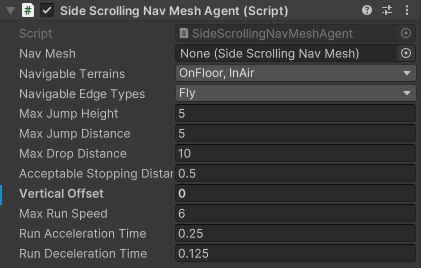
Now that I had this navigation graph, enemies could run A* to calculate their path to their desired destination. I wrote a SidescrollingNavMeshAgent component to put on enemies that specified their maximum jump and drop size, what vertex and edge types they could navigate, and other standard movement parameters like movement speed, acceleration, and deceleration. Those parameters would all be used as filters on what vertices and edges they could use in the graph while calculating their path. Once they had their path, the difficult part was actually following it.

There were several touches necessary to make movement feel as non-awkward as possible. The first was combining FloorTraversal edges into one in the path. This allowed me to simplify the ground traversal logic to:
- If you are not yet up to full speed, and you are more than your stopping distance from the next vertex on the path, accelerate toward your max speed, toward that next vertex.
- If you are full speed, and more than your stopping distance from the next vertex, maintain full speed toward that vertex.
- If you are within the stopping distance from the next vertex, decelerate accordingly.
- If you have overshot the next vertex, stop immediately and move on to the next edge in the path.
With that logic, but without combining floor edges, enemies would have taken one step, stopped, taken another step, stopped, and so on all the way across the floor. I had a bug for a little bit that actually made them do that.
The next touch was turning Flying edges into a spline instead of just a series of straight lines. I had a desired start position (the enemy’s current position), desired end position (the next vertex in the path), desired starting velocity (the enemy’s current velocity), and desired end velocity (a bit more complicated), and I could create a cubic spline based on those parameters for the flying enemy to move along. Once it reached the vertex, it would move on to the next edge in the path, and calculate a new cubic spline.
The spline method I used to decide the desired end velocity was the Catmull-Rom spline. Basically, for the normal at each point on the spline, you use the direction between the points before and after it.
The most mathematically complex one was jump and drop trajectories. You know I’ve already done a lot of math on jumping for this project, so I’m up for the challenge. On Awake, I calculated the jump gravity and maximum initial jump speed the same way I did for the character controller. We know the horizontal distance of the jump, and the horizontal movement of the enemy, so we can use that to calculate the time the jump should take. But either the horizontal distance or the vertical distance can be the limiting factor on this jump’s time, so we need to calculate the time required for the vertical distance as well and use the higher number for the jump duration. If vertical distance is the limiting factor, I assume the enemy will jump only exactly as high as required to reach their goal, and not a centimeter more. Either that, or they will not jump upward at all at the start of a drop. Either way, either the starting or ending vertical velocity is 0. Without loss of generality, we’ll treat starting velocity as 0, since that simplifies calculating duration. If we treated ending velocity as 0 instead, we would just be switching starting and ending velocity, without actually changing the duration. Since we know gravity and the initial velocity, we know the vertical position as a function of gravity and time:
t^2 = 2y/g
t=square root(2*y/g)
In case the equation image doesn't show for some reason.
You may notice that I switched the sign of y in there. Y should actually be negative, since this is for the case where we’re dropping. I switched the sign of y so that it’s just the distance we’re jumping or dropping, so we don’t need to worry about it being a signed distance.
Now that we have the minimum time required for the x movement, and the minimum time required for the y movement, we take the maximum of the two as the jump duration. Now we have the following parameters for the jump:
- Duration
- Starting point (x and y)
- Ending point (x and y)
- Gravity
We can use those to calculate a trajectory. Let’s do horizontal velocity first, since that one’s easy.
And, more importantly, the function for horizontal position:
Now to calculate initial vertical velocity. We know that:
We actually know everything in this equation except for initial velocity (t is the duration, y is the vertical distance, signed this time), so we can just solve for it:
And, once we calculate that, we can plug that back into the function for vertical position:
Now we have both x and y as functions of t, and we know how high t goes, so we can easily update the position based on that every fixed update to create a realistic-looking jump arc.
Interruptions
Now here’s another tricky part. Enemies need to update their destination and pathing periodically if they’re trying to follow you, because you’re going to be moving pretty quickly. When they do update their path, they need to be able to do so without it being jarring. So, when the nav mesh agent gets its destination updated, I check the edge its currently navigating. If it’s not a jump or drop, I’ll clear the path, calculate a new path from their current position, and calculate the trajectory for its new first edge in its new path. But if it is a jump or a drop, it would be really weird for them to interrupt their jump to suddenly change course. So I clear the path after that jump or drop edge, and calculate a new path starting from the end point of that edge.
Enemies won’t necessarily spawn in a position they are able to navigate on at all. If that happens, I want them to handle it gracefully by falling to the floor below, and then be able to navigate. So, on enable, I check their current nearest vertex. If it is not a type they can navigate, I start scanning downward from there until I find one they can navigate. Then, I give them a Drop edge from their spawn position to that vertex beneath them to start off.
Enemies can be staggered or stunned by your attacks. What happens if they get staggered or stunned mid-jump? Well, this actually has the same solution as the problem of spawning in the air. I disable the nav mesh agent when they are stunned or staggered, and re-enable when they recover. And since that downward scan and drop is done on enable instead of just on Awake, they will also drop smoothly after being staggered mid-jump.
If they are interrupted by a stun or stagger while running on the floor or flying through the air, they simply stop their movement. When the nav mesh agent is re-enabled, they will once again find their nearest nav vertex, and start once again calculating their path to their destination from there.
Main Component 2: Behavior Trees
Bahvior trees are a classic AI technique that allow you to write lots of small, modular behaviors or tasks, and then combine them into a complex decision tree to create complex behaviors and decisions. I considered using state machines instead, but behavior trees have the advantage that behaviors in a behavior tree don’t need any awareness of each other, unlike states in a state machine, which makes behavior trees more reusable.
A behavior tree is defined by many nodes, which each contain their own logic for having the enemy execute certain actions. There are two broad categories of nodes: decorator nodes, and task nodes. Decorator nodes have one or more child nodes, and they contain their own logic to execute and alter the result of those child nodes. Task nodes perform a concrete action. Every node type has an execute function which is called every frame when that behavior is in progress, and a current status, which is generally returned by the execute function. The status can be either In Progress, Success, or Failure. Once you get used to thinking with behavior trees, you can combine together many nodes to create complex enemy behaviors with ease.
Another important component for making a behavior tree work is the blackboard system. Behavior tree nodes need a mechanism for communicating with each other. Specifically, we want some nodes to be able to post data to a shared data structure, and other nodes be able to read that data. That shared data structure is generally called a Blackboard. As an example of why that is useful, I just have one Navigate task node. It reads the navigation destination from the blackboard. It doesn’t need to be concerned with how that destination was decided. It just reads the location and navigates there. There are a few different task nodes that can be put right before the navigation node in a sequence that will set that destination in the blackboard. One just sets it to the player’s location, to make the enemy chase the player. One chooses the best option from a list of waypoints and sets that as the destination. One figures out what section of floor the enemy is on and sets the destination to the far edge of that section of floor. And there are a few others.
I implemented the blackboard as its own MonoBehavior component, and passed that component into every task node in the constructor. That’s called dependency injection, because for some reason, software engineers have decided that a technique as basic as passing a dependency to an object in its constructor deserves a fancy name. The Blackboard component has the functions:
- GetInt
- SetInt
- GetFloat
- SetFloat
- GetVector2
- SetVector2
- GetGameObject
- SetGameObject
They all take a string as the key. The Get functions return the specified type, and the Set functions take an argument of the specified type. They all read or write the relevant data to a C# Dictionary of strings to generic objects.
There are several walkthroughs online already for implementing behavior trees in Unity. I can’t find the one I first referenced anymore. But there’s also this one: https://medium.com/geekculture/how-to-create-a-simple-behaviour-tree-in-unity-c-3964c84c060e. Don’t use this one. It’s wrong. Their sample code for a sequence node executes all of the children concurrently, not in sequence. That’s such a basic mistake. Their selector node does the same. Their blackboard system technically works, but it’s messy and duplicates a lot of data, wasting memory. And then to act like their system works, they just put the enemy’s entire logic in one node, completely defeating the purpose of creating a behavior tree system in the first place.
Decorator/Composite Nodes
So, the basic decorator nodes I created were:
- SequenceNode - This node executes several child nodes in sequence, and succeeds only if every child node succeeds. It does NOT execute them all in the same frame. That would effectively just be executing all of the child tasks concurrently, resulting in a sequence node that is not actually useful for hardly anything. The sequence node keeps track of which child node it is currently on, and executes that child. If that child fails, the sequence node fails. If that child succeeds, the sequence node will update to the next child. If the child is in progress, then we will execute that same child again in the next execute call.
- SelectorNode - If the SequenceNode is an AND for child nodes, the SelectorNode is an or. This executes a series of child nodes UNTIL one succeeds. Again, it does NOT execute them all in the same frame. This would result in your enemy sometimes starting behaviors it shouldn’t have because a previous node in the selection just hadn’t failed yet. It keeps track of which child it is on, and executes that child. If that child succeeds, then the selector node succeeds. If the child fails, it moves onto the next child. If the child is in progress, then it will execute that same child again in the next execute call.
- RepeaterNode - This has one child, and will repeatedly execute that child every frame even if that child fails or succeeds. This is done by simply executing the child node, and then returning InProgress as its own status, regardless of what the child returned.
- TimeoutNode - This is a less standard decorator node, but a very useful one to me. I gave this node type a child node and a time limit. It would execute the child every frame until the child either failed or succeeded, or until the time limit was reached, in which the timeout node would return a failure.
- ExecuteWithCooldownTimeNode - This is another less standard, but quite useful, node for me. I gave it a child node and a cooldown time. It would execute the child until it succeeded, once. After that point, it would start a cooldown timer, and if it was executed again during cooldown, it would not attempt to execute the child again, but immediately fail. I used this generally at the start of a selection node, when I wanted the enemy to use an attack no more than once every x seconds. If the attack was still in cooldown, the node would fail and cause the selector node to move on to an alternative action.
- RaceBehaviorNode - This is the node where I intentionally did what the bad tutorial above did unintentionally. It executes every child node every frame, and returns the result of the first one that completes. I mainly used this before I added the cooldown and timeout nodes.
And there were a few others that I’ll get to later.
Task/Action Nodes
The task nodes I added were:
- AlwaysSucceedTaskNode - Exactly what it sounds like. Sometimes it is useful to just have a no-op success task node.
- AlwaysFailTaskNode - Exactly what it sounds like.
- AttackTaskNode - This just triggers the attack animation. I made it so I could pass in a custom string for the animator trigger, with it defaulting to “Attack”. That makes this node a bit more reusable for different attacks that are really just different animations, with no difference in gameplay logic.
- ChargeAttackTaskNode - This one sets the navigation destination to the far edge of the section of the ground they’re on, and has the enemy simultaneously trigger an attack animation and run toward that destination. It returns complete when they reach the destination.
- LocatePlayerCharacterTaskNode - This one simply gets a reference to the player character gameObject and writes it to the blackboard so all the other behavior nodes can use it as needed. It’s generally the first task node any enemy executes.
- LocateTargetTaskNode - This one gets the player character gameObject from the blackboard, and writes their position to the blackboard as the navigation destination. This is actually rarely used, because it was generally replaced by the next one in the list.
- LocateFloorBeneathTargetTaskNode - This one gets the player character gameObject from the blackboard, finds the nearest OnFloor navigation vertex beneath that position, and sets that as the navigation destination in the blackboard. Since this is used for chase behavior with ground-based enemies, setting the destination to a point on the ground even if the character is mid-jump makes the enemy’s navigation much more sane and reliable than the previous node.
- SetStaticDestinationTaskNode - This task node has a Vector2 passed to it in its constructor, and it just writes that to the blackboard as the navigation destination. This is useful for having an enemy follow a predefined patrol path.
- RangedAttackTaskNode - When I wrote this, it seemed to me much more distinct from the AttackTaskNode. I mean, this one is spawning a projectile! But no, this also just triggers an animation, and the projectile is spawned by an animation event. The only functional difference between this and the regular AttackTaskNode is that this one makes the enemy face toward the player first. These really could have been combined into one class.
- ShoutTaskNode - Most of the monsters in the asset pack I’m using have a shout animation. I had planned special abilities for most of my enemies, so I decided it was a decent fit to have them shout when they use their special abilities. These abilities are quite varied, but guess what? This task node only needs to trigger the shout animation. The specifics of each ability are also handled using animation events. I could have just had a generic PlayAnimationTaskNode. If I do a major refactor, I’ll do that.
- StartNavigationTaskNode - This sets the destination on the navigation agent, calculating the path there, and setting the navigation agent in motion. If the path is calculated successfully, this node will return success right away.
- StopNavigationTaskNode - This stops the navigation agent, clearing its path and setting its destination to its current position. (It’s a bit more complicated; see the part earlier about if the enemy is in the middle of a jump or drop)
- WaitForAtDestinationTaskNode - This returns in progress for as long as the navigation agent is moving. Once it stops, this returns success if it has reached its destination, and failure if not.
- FindEdgesOfPlatformTaskNode - This is kinda weird to have as its own task node. Probably should have just been a helper function. This node reads a Vector2 from the Blackboard, finds the ground node beneath it, and follows FloorTraversal edges left and right from there as far as possible, recording both edge positions on the Blackboard. Its constructor takes a key string for what Vector2 to read from the Blackboard. In one case, I have it operate on the enemy’s position, and in one case, I have it operate on the player’s position. It’s a really weird one.
- PickRightOrLeftEdgeToNavigateToTaskNode - An almost as weird one. This task node assumes it is running right after FindEdgesOfPlatformTaskNode, and reads the left and right edge positions from the Blackboard. It figures out which one is closer, and writes that one to the Blackboard as the navigation destination.
- WaitForSecondsTaskNode - Just a wait task. It is created with a wait duration. It returns in progress until that duration has passed, then returns success.
- WatchForPlayerCharacterTaskNode - I pass this task node a trigger collider in its constructor. It returns in progress until the player character is inside that trigger collider. This is used either with the enemy’s “leash area” as the collider, to have them wait until the player enters it for them to start attacking, or with a small trigger collider right in front of the enemy to trigger a melee attack task when they notice the character right in front of them.
Those are all of the standard task nodes that were shared across multiple enemies. There were a few others that were specifically tied into one enemy’s specific behaviors.
Enemy Behaviors
I created the framework for behavior trees and all of these behavior nodes for it, but I stopped short of creating a custom GUI editor for them, so I constructed each enemy’s behavior tree manually in code. It would have been a little bit easier with a GUI editor, but honestly not much. I think with twice as many enemy types, it might have been worth the work to make a custom editor. As it was, I made one base class to manage basic behavior tree logic:
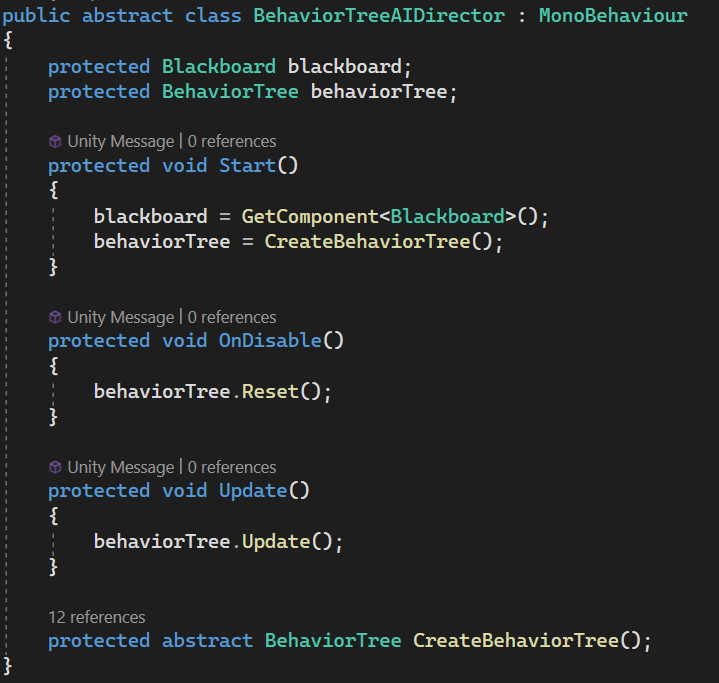
That’s the whole class. It has a Behavior tree, which is created by an abstract function on Start. On Update, it just calls Update on the behavior tree. On Disable, it just calls Reset on the behavior tree. The behavior tree class is even simpler:
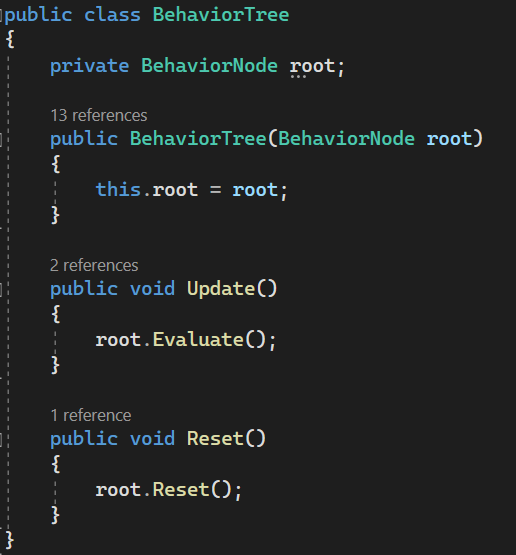
It literally just has a root node, and it forwards Update calls to the root node’s Evaluate function, and Reset calls to the root node’s Reset function. Reset is something I didn’t talk about much. Many of the nodes have internal state that they need to keep track of, and Reset, well, resets that. SequenceNode keeps track of which child its on; Reset resets it to the first child. Reset also resets all of its children. WaitForSecondsTaskNode keeps track of how much time is remaining to wait. Reset resets that to its total wait time. And on the list goes. You can imagine what the Reset function would do for most of these nodes. Not only is Reset called on the whole tree when the AI director is disabled; Reset is also called on individual nodes or branches when they complete in either success or failure. That is generally up to the node’s parent.
But anyway, for each enemy, I just extended that BehaviorTreeAIDirector class, and overrode that CreateBehaviorTree function. And I’ll talk about some of those specific behavior trees in the next section. But first, there is one more critical component.
Main Component 3: Coordination
Token Pools
You may have gathered that I found the token pool system from Doom 2016 fascinating. So I used the same approach to ensure only a certain number of enemies can be attacking at once. I actually have two different token pools in my game: a melee pool and a ranged pool. The token pool itself is pretty straightforward. It keeps track of how many tokens it has. I put a difficulty option in my game for “Enemy Aggression”. Each token pool can specify how many tokens it has based on that option. I have settled on 1 for low aggression, 2 for medium aggression, and 3 for high aggression for both pools. When an enemy wants to do an attack, it requests a token from the appropriate pool. If the pool has more than 0 tokens, it reduces its token count by 1, and returns true to the enemy that requested it. If it is at 0 tokens, it returns false to the enemy that requested it. If the enemy got true from its request, it continues with the attack. Once it finishes the attack, it releases the token back to the token pool, and the token pool adds 1 back to its token count.
To facilitate enemies claiming and releasing tokens, I implemented a new behavior tree decorator node: ExecuteWithAttackTokenNode. This node takes the token pool object (melee or ranged), the time limit for successfully acquiring an attack token, and the child node to execute once it does successfully acquire a token. If it gets false from the token pool, it returns in progress. If the time limit is reached and the token pool still has only returned false, then the node fails. If the token pool returns true, then it will go on to execute the child node and return its result. Once the child node results in either success or failure, it will reset itself. Its Reset function will release the token back to the token pool if it has claimed one. Now I can create a sequence like so:
- LocateTarget
- StartNavigation
- WaitForAtDestination
- Attack
- WaitForSeconds (for the attack duration)
That is a full sequence to navigate to the player and attack them. And I can put that whole sequence as the child of an ExecuteWithAttackTokenNode, and the enemy will acquire a token before it starts that sequence, and release the token when it finishes or is interrupted.
Waypoint Pools
What token pools are to attacks, waypoint pools are to navigation. I want to be able to set points of interest to enemies in each arena. Ranged enemies will choose from the pool of waypoints to decide which spot is the best to stand in while shooting. Support enemies will choose from the pool of waypoints to decide which spot is the best to stand in to get away from you. But I don’t want all of the enemies going to the same spot. I want them to spread out. Enemies all going to the same spot leads to a tedious game of kiting the enemies around while slowly picking them off one by one. Enemies all going to different spots creates a much more frenetic feel, even though only two of them can be attacking at any given time.
So, when an enemy chooses a waypoint to navigate to, they claim that waypoint and remove it from the available pool. Once they finish what they want to do at that waypoint, they release it back into the waypoint pool. I created two waypoint pools for each arena: a ground waypoint pool for all the ground-based enemies, and an air waypoint pool for all the air-based enemies.
And you guessed it: to facilitate enemies claiming and releasing waypoints, I created a new behavior tree decorator node: ExecuteWithWaypointNode. This node takes the waypoint pool object (ground or air), the time limit for successfully acquiring a waypoint, a utility function for which waypoint is best, a child node to execute after successfully claiming a waypoint, and a fallback child to execute if it doesn’t succeed in claiming a waypoint. Until it claims a waypoint, it will evaluate all of the available waypoints in the pool using its utility function.
I wrote utility functions to return a negative number if a given position is absolutely unacceptable, and positive numbers for acceptable positions, with higher numbers meaning more desirable positions. If the utility function returns a negative, the enemy will not claim that waypoint even if there are no other waypoints available. For example, shooting enemies will not claim a waypoint that does not have line of sight to the player character no matter what.
If it finds a suitable waypoint, it will claim the best one, write that to the blackboard as the navigation destination, and then execute the child node, returning its result. If it does not, it will return in progress. Once the time limit has run out, if it still has not found a suitable waypoint, it will begin executing its fallback child node and returning its result.
Once whichever child it is executing finishes, it will reset itself. Its Reset function releases any waypoint it had claimed back into the waypoint pool, and resets both children.
This node also allows me to specify if they should not use the same waypoint twice in a row. If so, on a successful child execution, it will keep track of the waypoint it used for that execution, and not reset that when the Reset function is called. The next time the node is executed, it will exclude that node from its considerations for which node to use. That’s useful because I don’t want a ranged enemy to just stand in one spot and shoot at you repeatedly. I want them to reach a spot, shoot, then start moving again.
You know the AlwaysSucceed and AlwaysFail task nodes I created for behavior trees? Those were kind of weird, right? Well, they come in handy with the ExecuteWithWaypointNode’s fallback child node, if I don’t want the enemy to do anything as a fallback without a waypoint. They give me just a placeholder node to effectively not have a fallback, while also not breaking the code or having to write any special cases.
Now I can create a sequence like so:
- StartNavigation
- WaitForAtDestination
- ExecuteWithAttackToken
- RangedAttack
- WaitForSeconds (for the ranged attack animation duration)
That is a full sequence to navigate somewhere and do a ranged attack. I can put that as the main child of an ExecuteWithWaypointNode, with the melee sequence from above as the fallback child, and that will make the enemy find a waypoint that has line of sight and an appropriate distance to the player character, navigate there, and shoot at the player character, all while communicating to other enemies not to navigate to that same spot. If there is no good spot for the enemy, then they will navigate up to the player and do a melee attack instead.
Examples
Three of my main goals for the enemy AI were:
- Make combat feel frenetic while actually limiting how many enemies could be attacking at once.
- Make enemies intentionally not take cover so they are easy to aim and shoot at, and the player can focus more on movement.
- Make a variety of different enemy behaviors that test different player skills and demand different actions of players.
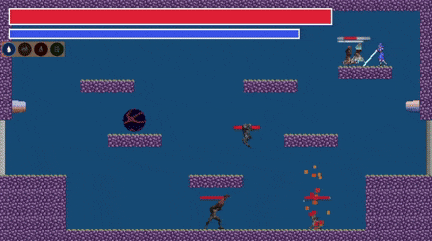
The token pool system and waypoint pool systems worked together to achieve the first goal. The utility functions in the waypoint pool system helped me achieve the second goal. And the behavior tree framework gave me the tools to achieve the third goal. I designed nine different enemies, each with their own unique behaviors. Here are just a few of them:
- Crawler - They walk back and forth on a patrol path, and attack if you’re right in front of them. I can either set the patrol by manually assigning waypoints in the editor, or they can find the left and right edges of the platform they spawn on top of, and use those as the waypoints. Their behavior tree is:
- Repeat
- Sequence
- Race
- Repeat
- A sequence to handle navigating along the patrol route.
- Watch for player right in front
- Repeat
- Stop navigation
- Attack
- Wait for attack duration
- Race
- Sequence
- Repeat
The race makes the enemy patrol repeatedly while simultaneously watching for the player right in front of them, and move on in the sequence once it sees the player right in front of them, stopping navigation and attacking
- Spitter - These are like Imps in Doom. They run around, find a spot to stand that has line of sight to you, and shoot a projectile at you. If they can’t find a good spot from which to shoot you, they run up and do a melee attack. Their behavior tree is:
- Repeat
- ExecuteWithWaypoint
- Sequence
- StartNavigation
- WaitForAtDestination
- ExecuteWithAttackToken (ranged)
- Wait for ranged attack duration
- Fallback: ExecuteWithAttackToken (melee)
- LocateTarget
- StartNavigation
- WaitForAtDestination
- Attack
- Wait for melee attack duration
- Sequence
- ExecuteWithWaypoint
- Repeat
- Charger - These are like Hell Knights in Doom. They pursue you aggressively, and always try to get on the same platform as you, and do a charging attack across the platform at you. Their behavior tree is:
- Repeat
- Sequence
- LocateTarget
- FindLeftAndRightEdgesOfPlatform
- PickLeftOrRightEdgeToNavigateTo
- StartNavigation
- WaitForAtDestination
- ChargeAttack
- Sequence
- Repeat
Other enemies I won’t be describing the whole behavior trees of:
- Spiker - These area denial enemies will look for a waypoint with line of sight to you, and then earthbend an explosive rock out of the nearest floor or wall to you. You have about a second after the visual warning appears to get out of that radius, or it will do big damage. They have a cooldown on how often they will create those, and they may go in for melee attacks during their cooldown. The explosive rocks will stick around and remain a hazard until they explode. You can set them off by entering the radius, or by shooting them. They can do damage to enemies as well.
- Immolator - These area denial enemies set themselves on fire, slowly draining their own health, and walk toward you, leaving a trail of fire on the ground behind them that will hurt you if you step on it. The fire will go out about 5 seconds after they are there.
- Defender - These support enemies will generate shields for all nearby enemies, rendering them immune to all damage. The shields last about 10 seconds or until you kill the defender. They have a 15 second cooldown on creating those shields, so you have about a 5 second break in between shields. While the shields are up, they will look for waypoints away from you, and run away to them.
- Healer - These support enemies will heal nearby enemies if they detect that any enemies are significantly hurt. Otherwise, they will look for waypoints away from you, and run away to them.
- Flyer - These flying nuisances will navigate to an air waypoint that has line of sight to you, then attempt to dive bomb you.
The behavior trees I spelled out here are actually simplified versions of the actual ones. I left out the boring stuff like finding the player character at the start, of course. But also, most of the navigation sequences are actually on a timeout and a loop. That’s because the player moves around a lot, and most decisions of where to navigate to are based at least in part on the player’s position. So, navigation destinations need to be updated frequently, more frequently than the enemy can reasonably finish navigating somewhere. Figuring out the exact right structure for these trees was a process of tweaking and testing, and tweaking some more.
Conclusion
I’m pretty satisfied with the AI systems I’ve developed for this game. They’re not perfect. Navigation still has occasional bugs. An editor GUI for the behavior trees would be great. There are also great pre-made behavior tree systems you can get off the asset store. I’ve heard good things about Playmaker and Behavior Designer. I can’t say what it’s like to actually use those tools, but unless you’re just really excited to implement your own behavior trees like I was, it would probably be easier to go with one of them. I know they at least have editor GUIs.
Now, I don’t know of a pre-made side scrolling AI navigation system like the one I made. I feel like surely it must be out there, but I didn’t find it in my search.
My general advice is to use pre-made tech if you can, unless you’re just really excited to build your own, like I was. And if you are building your own enemy AI systems, I hope this was useful to you. I'll sign off with another gif of my enemies being cool.
Leave a comment
Log in with itch.io to leave a comment.